
Options and lists
Add lists and options to the panel, from the iJewel library or with your own pictures, and choose where customers start.
The options panel is made of lists. Each list is one choice of your customer, for example Shape or Head Metal. Each list has options, with a picture and a name. You change the panel in place in the editor, and each change is saved after a moment.
Three kinds of lists
| Kind | What it does | Examples |
|---|---|---|
| A part | A new piece of the jewelry, with its own 3D files. | Head, Shank, Chain |
| A list inside a part | One more choice that changes the 3D file of a part. | Shape, Carat and Head style inside Head |
| A material | Changes the color of a metal or a stone. It needs no 3D file. | Shank Metal, Center Stone |
The lists of a part decide which 3D file shows. In the Engagement ring template, the Head part has three lists: Shape, Carat and Head. Each combination of these three, for example Oval · 1.00 ct · Halo, has its own head file.
A material list changes one layer of the models: Metal 01, Metal 02, Gem 01 or Gem 02. In the Engagement ring template, Shank Metal changes Metal 01, Head Metal changes Metal 02 and Center Stone changes Gem 01. To prepare these layers in your CAD files, refer to Layers and names.
Add options from the library
- In a list, select Add new (the tile with a plus). The dialog Add to list name opens on the iJewel library.
- Select the options that you want. Each one goes into the row at the bottom.
- Select Add 1 option (or Add 3 options).
All 3 steps are done.
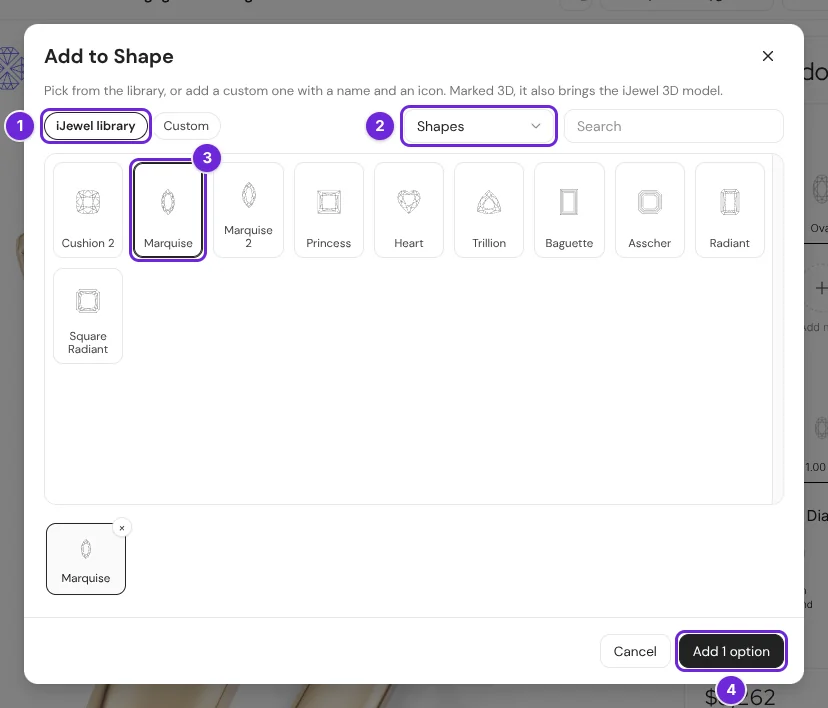
| # | What it is |
|---|---|
| 1 | iJewel library or Custom. |
| 2 | The group of the library: shapes, carats, heads, shanks, metals, gems and more. Use Search to find one. |
| 3 | A picked option has a dark frame. Select it again to take it out. |
| 4 | Add 1 option adds the picks to the list. |
An option marked 3D also brings its iJewel 3D model. Other options come with a picture only. They need a 3D file before your customers can pick them. Refer to Your own 3D models.
In a material list, the library shows metals and gems. They bring the iJewel material with them, so the color works at once.
Add an option with your own picture
- In a list, select Add new.
- Select Custom.
- Select Upload image and pick a PNG or an SVG file. The picture is kept with the configurator, so you can use it again in other lists.
- Type the Name of the option.
- Select Add, then Add 1 option.
All 5 steps are done.
Pictures on a clear background
A PNG or an SVG with a clear background looks best in light mode and in dark mode.
Edit a list
- Select the pencil of a list.
- Change the list or its options. Each row has the Icon (select it to change the picture), the Name, the SKU code, the arrows for the order, and the bin to delete it.
- Select Save changes.
All 3 steps are done.
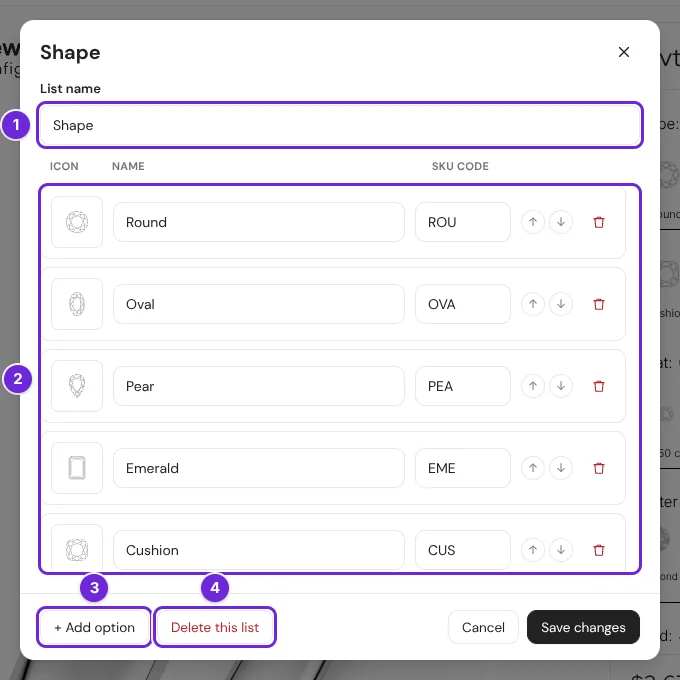
| # | What it is |
|---|---|
| 1 | List name: the name that your customers read. |
| 2 | One row for each option. |
| 3 | + Add option adds an option with a name only. |
| 4 | Delete this list removes the list and its options. |
If you close the dialog with changes, the editor asks: Keep editing, Discard or Save changes.
The SKU code is made from the name until you type your own. It goes into the SKU code of each combination. Refer to Prices.
For a material list, the dialog also has Material layer: the layer of the models that the list colors. A list with no layer shows a no layer tag, and your customers do not see it until you pick a layer.
Add a list
- Below the last list, select + Add list.
- Below What is it, select A part, A list inside a part or A material.
- Type the Name that your customers read.
- For a list inside a part, select its part below Belongs to. For a material, select Layer in the models, or I will decide later.
- Type a First option, or leave it empty to add options later.
- Select Add list.
All 6 steps are done.
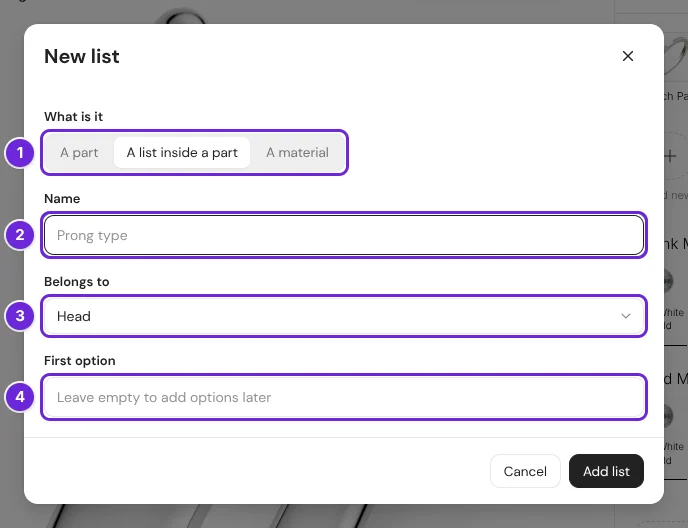
Change the order
- Lists: select the up or down arrow at the right of the list name.
- Options: open the pencil of the list and use the arrows of each row.
Choose where customers start
The options that are picked in the panel when you publish are the start of the configurator. Your customers see this combination first.
- Make sure that Hide edits is off.
- Select the options that you want to show first.
- Select Back to publish.
All 3 steps are done.
In edit mode you can pick any option, also one that a rule blocks. If a rule blocks the start, the preview and your customers start at the nearest combination that can be built.
The title and the button
- Title: select the pencil next to the title at the top of the panel. Type the Title and the Line under the title.
- Add to cart button: select the pencil on the button. Change the Button label, or turn off Show the button. The same dialog has Show "Try it on your hand".
To hide the title, the price or the button for your customers, use Manage → Settings → Customer view.
Change several parts with one choice
A material list paints its layer on every part of the configurator. Thus one choice changes all the meshes on that layer, in the head and in the shank.
- In your CAD files, put all the parts that must change together on the same layer, for example Metal 01.
- Do this in each file: the head files, the shank files and the other parts.
- Use one material list for this layer.
All 3 steps are done.
A part on a different layer, for example Metal 02, does not change with this list. It needs its own material list. Thus, put a zone with a different finish on its own layer only when your customers choose its material separately. To prepare the layers, refer to Layers and names.
Limits
A part can have up to 5,000 combinations, because each one is a 3D file. A change that goes over this limit is not made, and a message tells you why.