
Your own 3D models
Prepare, name, upload and match your own CAD files to the options of a configurator, and know which files count towards your limit.
A configurator shows one 3D file for each part of the piece. You can keep the iJewel library models of a template, replace some of them with your own, or build the whole configurator from your own CAD files.
Before you start
- Your 3D files must be GLB, GLTF, OBJ, FBX, STL or 3DM (Rhino). Each file is converted to GLB when you upload it.
- Plan the parts and the lists first. Refer to Options and lists.
How files match options
Each part needs one 3D file for each combination of its lists. Material lists need no 3D file.
Example: the Head part of the Engagement ring template has three lists.
| List | Options | Count |
|---|---|---|
| Shape | Round, Oval, Pear, Emerald, Cushion | 5 |
| Carat | 0.50 ct, 1.00 ct, 2.00 ct | 3 |
| Head | 4 Prong, 6 Prong, Halo, Hidden Halo, Secret Hidden Halo, Secret Bezel, Tulip | 7 |
5 × 3 × 7 = 105 head combinations, so up to 105 head files. A rule that blocks a combination removes its file from the count. The template does not make a pear stone in a six-prong head, so it needs 102 head files.
The Shank part has one list with 16 shanks, so it needs 16 shank files. The Shank Metal, Head Metal and Center Stone lists change the colors. They need no 3D file.
Keep the number of files small
Each option that you add to a list of a part multiplies the files of that part. Put a choice in a material list when only the color changes. Use a rule to block the combinations that you do not make.
Prepare your files
- One file for each combination of a part. A file holds that part only: a head file holds no shank.
- Model in millimeters, in place. All parts share one origin. A head file and a shank file must line up when they load together, as they sit on the finished piece. The library models are made this way. Refer to Units and scale.
- Layers for the materials. Put the metal on a layer with the name Metal 01 (and Metal 02 for a second metal), and the stones on Gem 01 or Gem 02. The material lists change these layers. Refer to Layers and names.
- Name each file after its options. Then the editor can match all your files at once.
Can I prepare the files in Blender?
Yes. The configurator finds the meshes of a layer by the name of their material. A GLB file from Blender has no layers, so the material name does the work of the layer name.
- In Blender, give the metal material the name
Metal 01(andMetal 02for a second metal). - Give the stone material the name
Gem 01(orGem 02). - Keep each part in place, with the same origin as the other parts.
- Export each part as a GLB file, with a name after its options.
All 4 steps are done.
The configurator does not use anchor layers such as placeholder:head. The parts line up because they share one origin.
Name your files
The editor knows the name that each file must have. Each box in Manage → Files shows this name until a file is attached.
The default name is the part, then the options of its lists, in lowercase, with an underscore between the words:
head_round_050ct_4prong.glb
head_oval_100ct_halo.glb
shank_classic.glb
You set the form of the names in Manage → Settings → File names.
| Setting | Choices |
|---|---|
| Built from | option names, or SKU codes |
| Part name first | yes or no |
| Between words | dash -, underscore _ or nothing |
| Letters | lowercase, UPPERCASE or as typed |
| Order | The order of the lists in the name. Select Change order. |
Example below the settings shows the name of one file, so you can check it before you rename your files.
Look at the expected names
Open Manage → Files and select No file. Each box shows the name that it waits for. Name your files the same way, then use Auto-match.
Upload and match your files
- Select Manage, then the Files tab.
- Drag your files onto Drag and drop files here, or select Browse files. You can upload many files at once. The files wait below Files to place.
- Select Auto-match. Each file goes to the box whose name has the same words. Capitals, separators and the order of the words do not matter. The message tells you how many files matched.
- For a file that did not match, select it, choose its options in the Attach dialog, and select Attach file. As an alternative, drag the file onto a box.
All 4 steps are done.
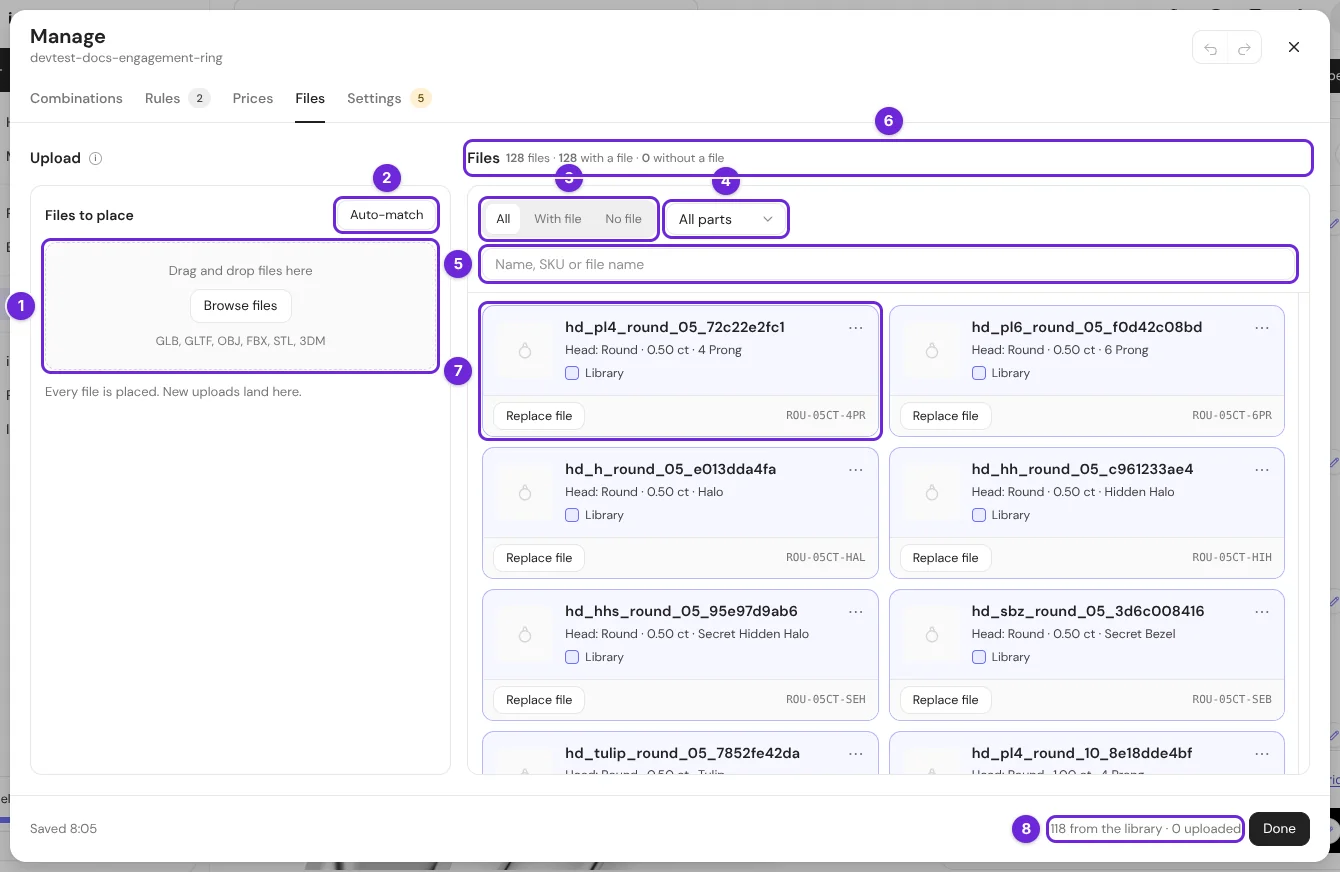
| # | What it is |
|---|---|
| 1 | Files to place: drop your files here, or select Browse files. The files that wait for a box show below it. |
| 2 | Auto-match attaches each waiting file to the box with the same name. |
| 3 | All, With file, No file: show all the boxes, or only the boxes with or without a file. |
| 4 | All parts: show the boxes of one part. |
| 5 | Search by option name, SKU code or file name. |
| 6 | The counts. Refer to What the counts mean. |
| 7 | One box: the file name, the combination that it is for, where the file comes from, Replace file or Add file, and the SKU code. |
| 8 | How many files come from the iJewel library, and how many you uploaded. |
The Attach dialog can also rename the file to the expected name. Turn on Rename next to "Rename to the naming convention".
Add one file to one box
- Select Add file (or Replace file) on the box. You can also select a part in the combination bar below the 3D view, then Add a file.
- Pick a model of the iJewel library, or a file below Uploaded files that waits for a box.
- Select Use this file. To upload a new file, select Upload from computer.
All 3 steps are done.
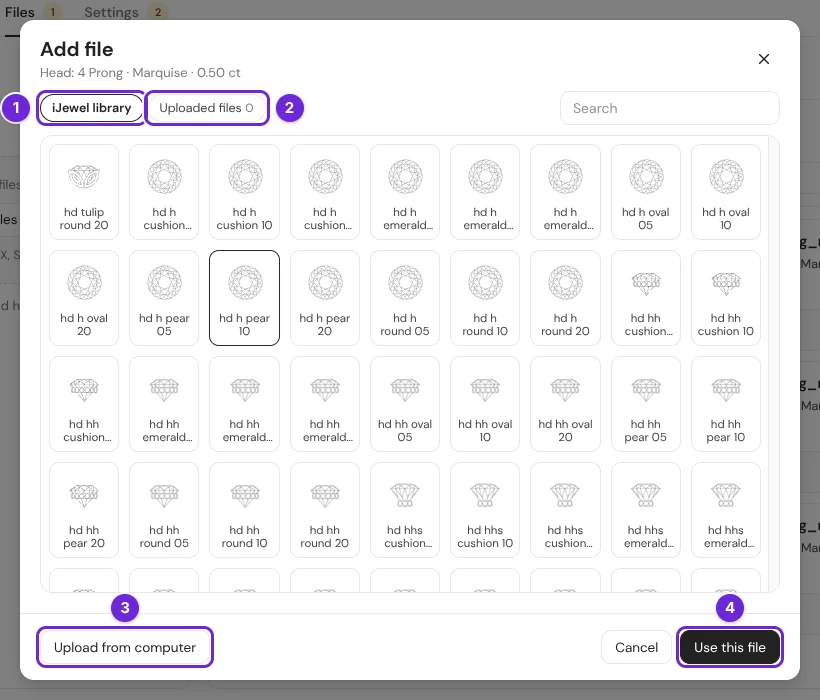
The ⋯ menu of a box has Details and Take the file out. Details shows the file and its name, and has Price of this model. You can rename your own files there. Take the file out removes the file from the box: your own file goes back to Files to place.
The tag on each box
| Tag | What it means |
|---|---|
| Library | A model of the iJewel library, linked to the box. |
| Uploaded | Your own file. |
| Uploaded, heavy file | Your own file, larger than 3 MB. It can load slowly on a phone. |
| Used by a fitting | No file of its own. A "use another model" rule shows another file for it. Refer to Rules. |
| No file | Nothing is attached yet. |
What the counts mean
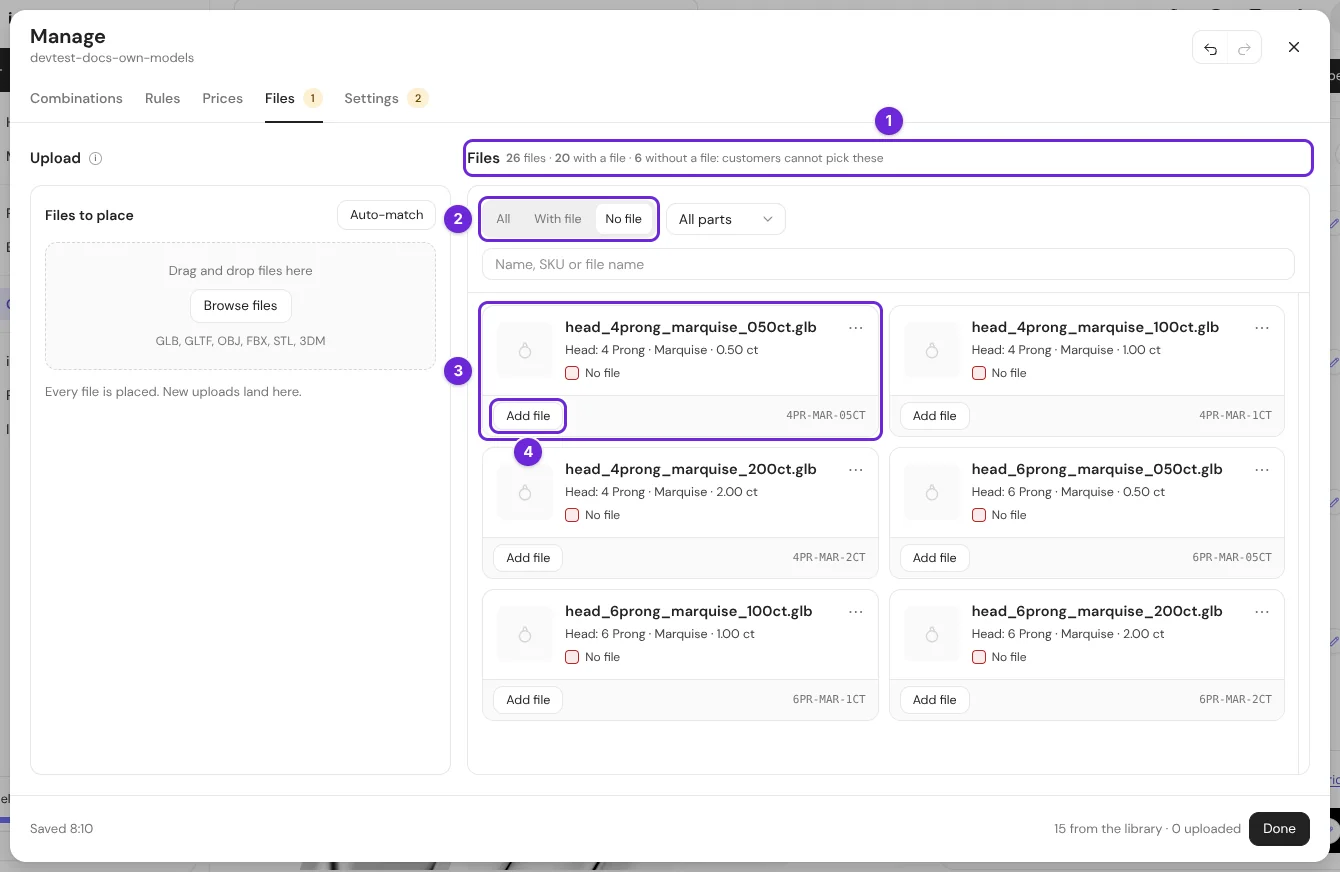
| Count | What it means |
|---|---|
| files | All the boxes: one for each combination of each part, and one for each option of a material list. |
| with a file | Boxes that have a file, or that a fitting rule covers. |
| without a file: customers cannot pick these | Model boxes with no file. Your customers cannot build these combinations: the option is grey. |
| materials without a file | Material options with no material file. They keep the material of the model. |
The card of the configurator counts the 3D model files that the configurator holds, and the ways that they can be put together. It does not count the material options, and it does not remove the combinations that your rules block. So the numbers on the card can be different from the numbers in the editor.
Library files and your own files
| iJewel library models | Your uploaded files | |
|---|---|---|
| Where they are | In the iJewel library. The configurator links to them. | In the folder of the configurator, in My Drive. |
| Model limit of your plan | Do not count. | Count, like every 3D file in your account. |
| Space in your account | None. | Yes. |
| Change them | Copy one to your folder first. | Yes. |
When you put your own file in a box that had a library model, the link to the library model is removed. The library still has the model.
Library files in My Drive
Open the folder of a configurator in My Drive (on its card: ⋯ → Show files). Below your own files, a Library files group lists the library files that the configurator uses, with a Library tag, the type and the size.
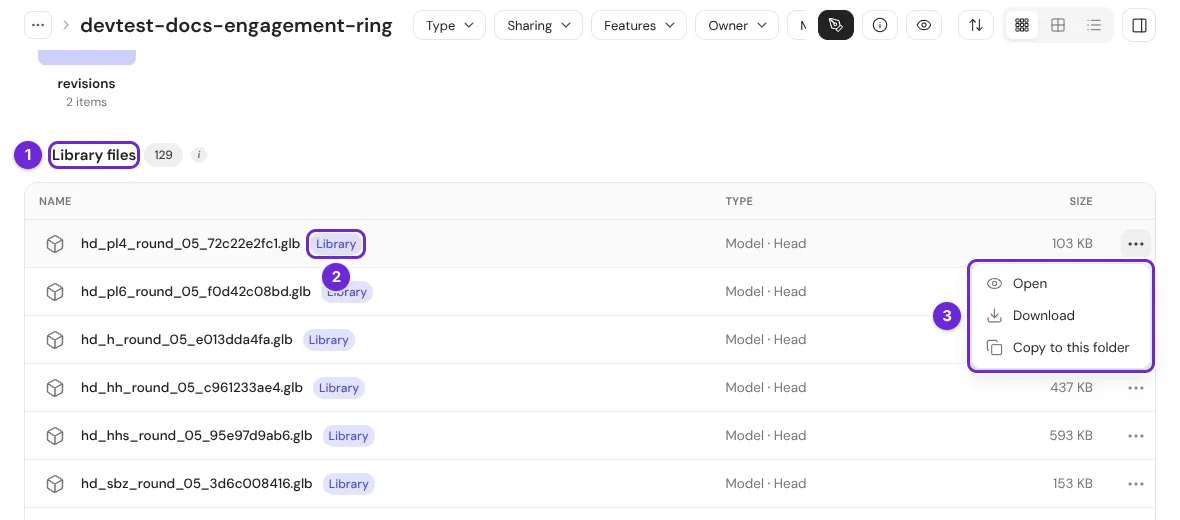
| Menu item | What it does |
|---|---|
| Open | Opens the file. |
| Download | Saves a copy on your computer. |
| Copy to this folder | Copies the file into the folder. The copy is your own file and counts towards your model limit. The configurator keeps the library model until you attach your copy to its box in Manage → Files. |
You cannot rename, move or delete a library file from this group.
Build the lists from your file names
When you start from scratch, the file names can build the lists for you.
- Create a configurator with Start from scratch. The 3D view says "Start with your 3D files".
- Select Add 3D files. Manage → Files opens.
- Drop all your files on Drag and drop files here. Use names like
head_tulip_round_1ct.glb. - When the upload ends, the dialog Build the lists from the file names opens. You can also open it with Build lists from the names. The first word of each name is the part. Each word that changes between the files is a list.
- Check the lists and change their names. Select Create 3 lists (the number changes with your files).
All 5 steps are done.
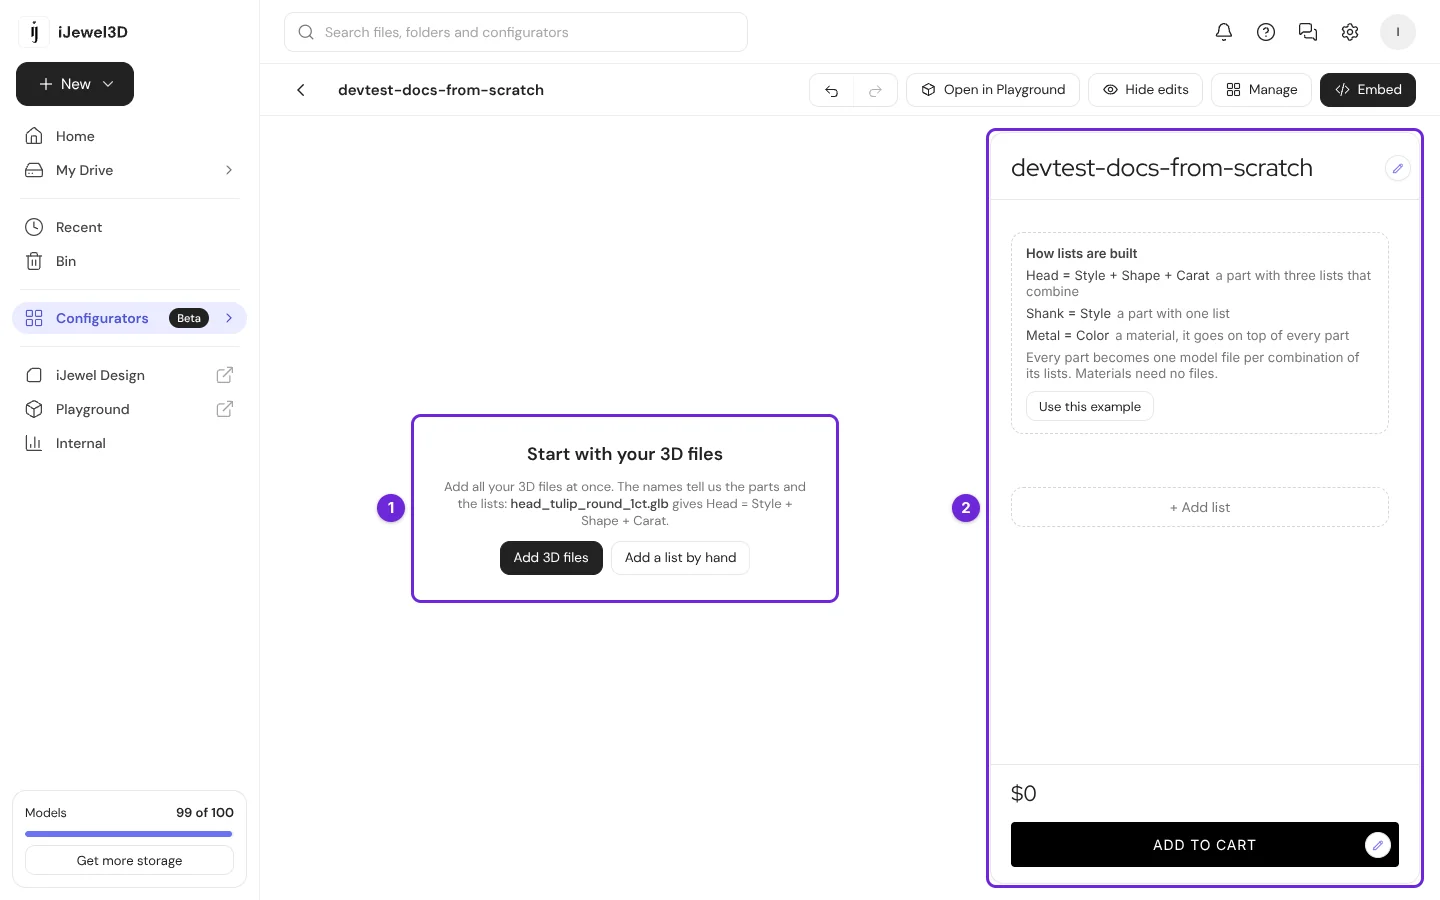
The message tells you how many lists were built and how many files were attached.