
Prepare a model in Rhino and MatrixGold
The steps in Rhino 7 or Rhino 8, and in MatrixGold, that make a jewellery file ready for iJewel3D.
MatrixGold runs inside Rhino. The commands on this page work in both. The rules behind the steps are on the 3D model guidelines page.
Before you start
- You have Rhino 7 or Rhino 8. A file from Rhino 5 does not open on the platform. Open it in Rhino 7 or Rhino 8 and save it again.
- The model is complete. You do the steps on a copy of the production file.
Set the units
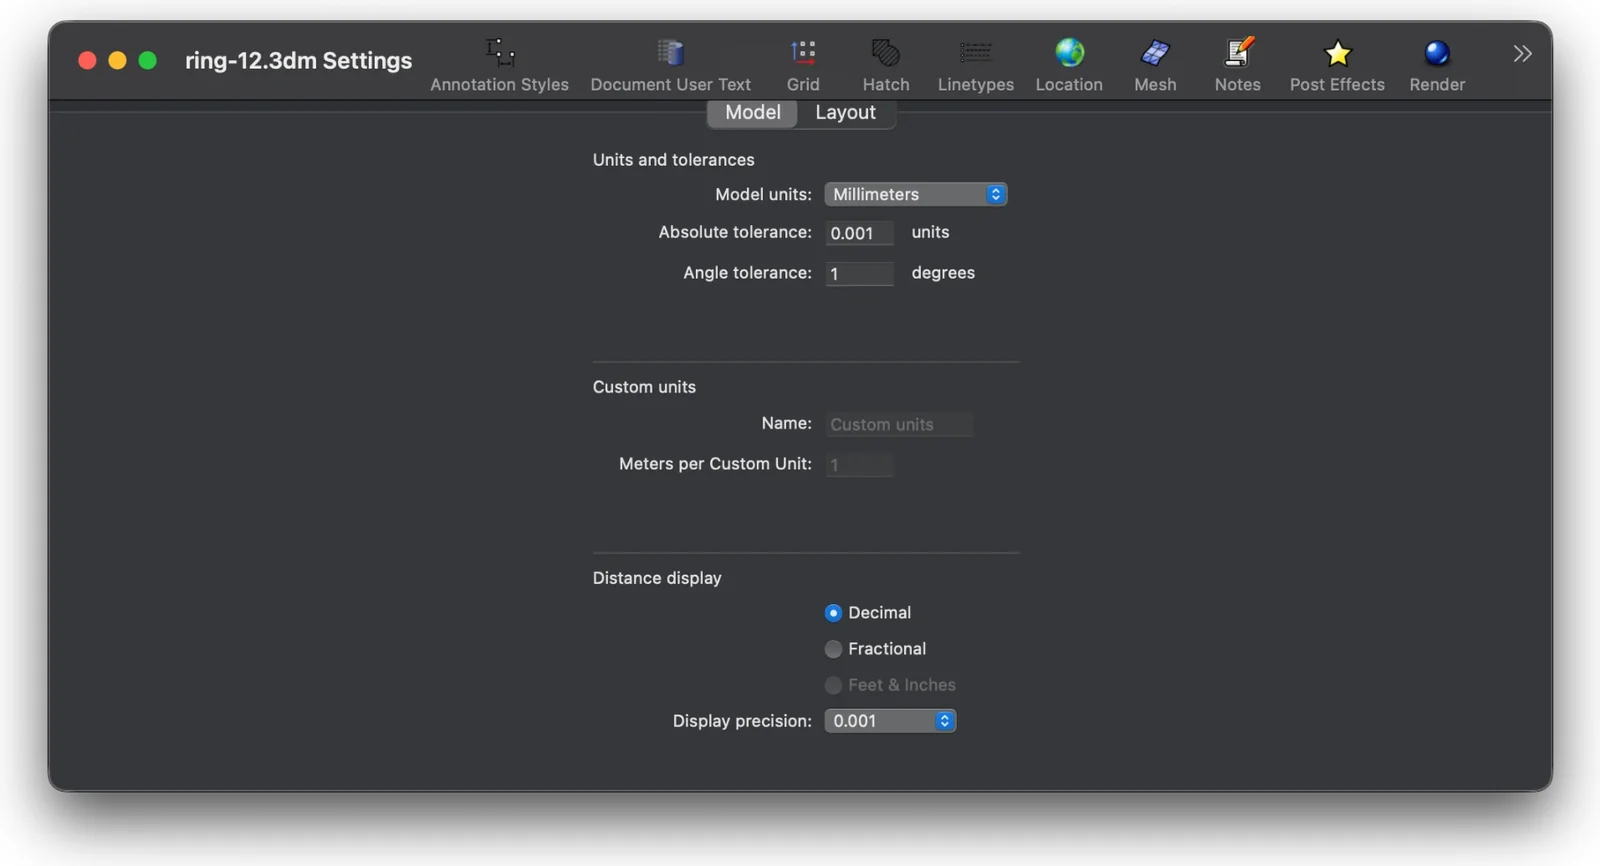
- Type
Unitsin the command line. - Set Model units to Millimeters.
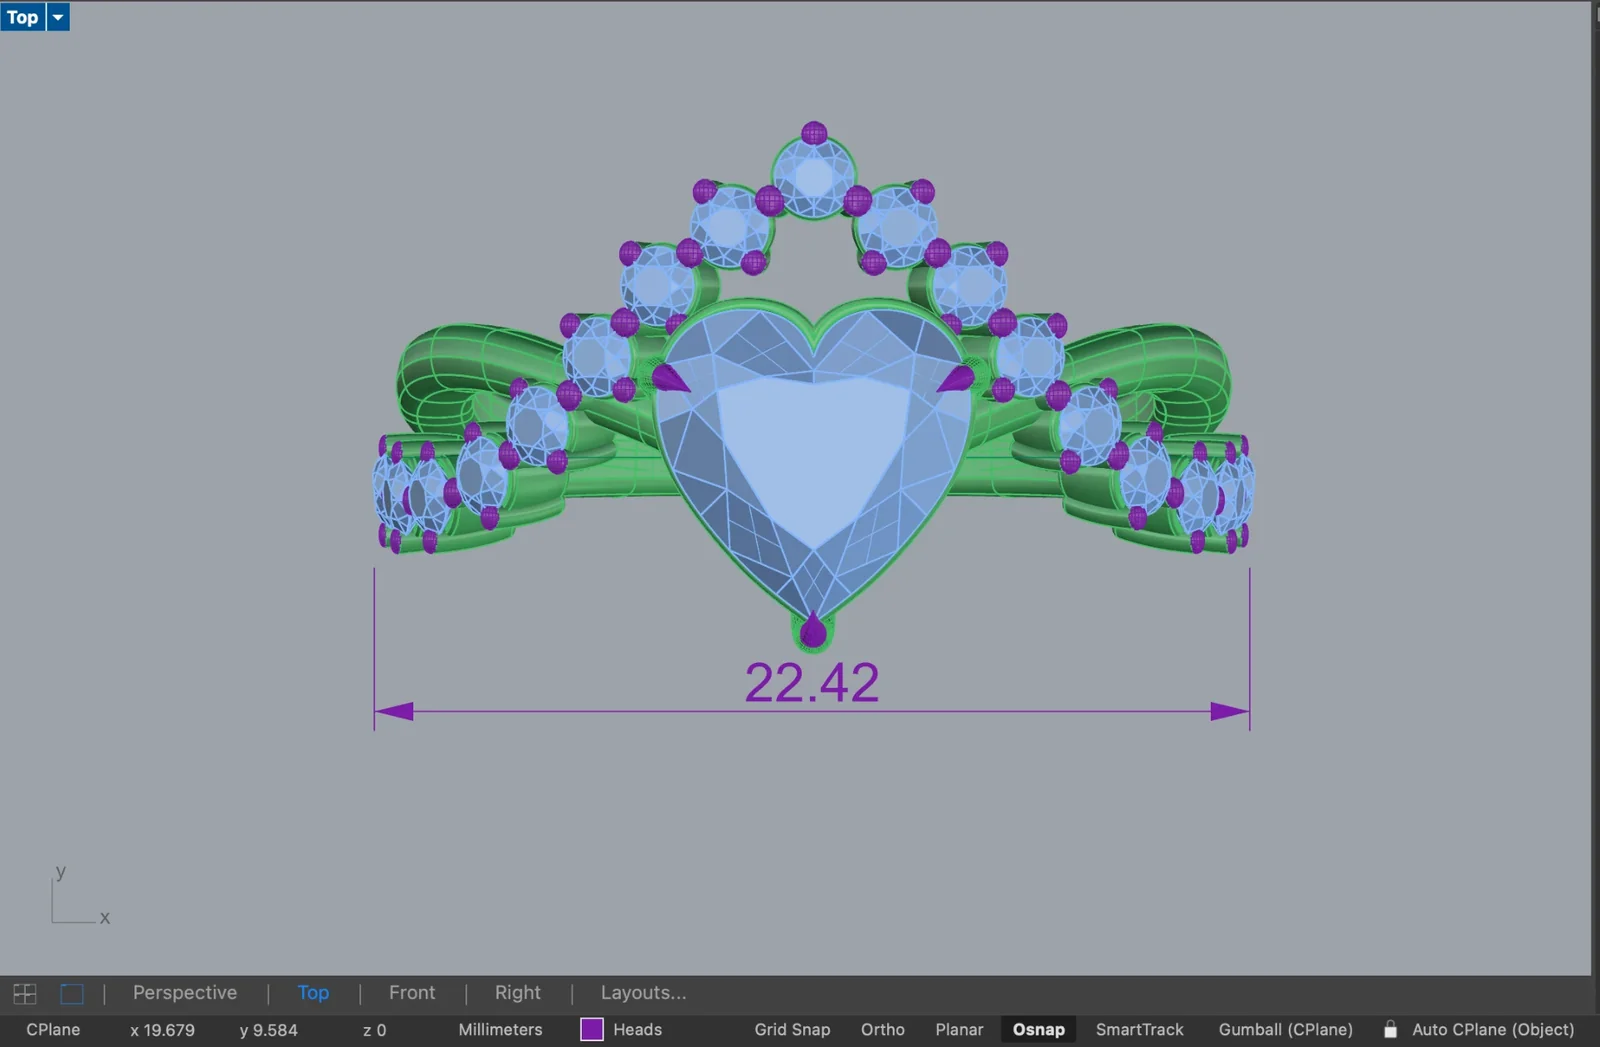
- Measure the ring across its width with
Distance. A ring is 15 mm to 25 mm across. - If the size is wrong, scale the model with
Scaleto the real size.
All 4 steps are done.
Make the layers
- Open the Layers panel.
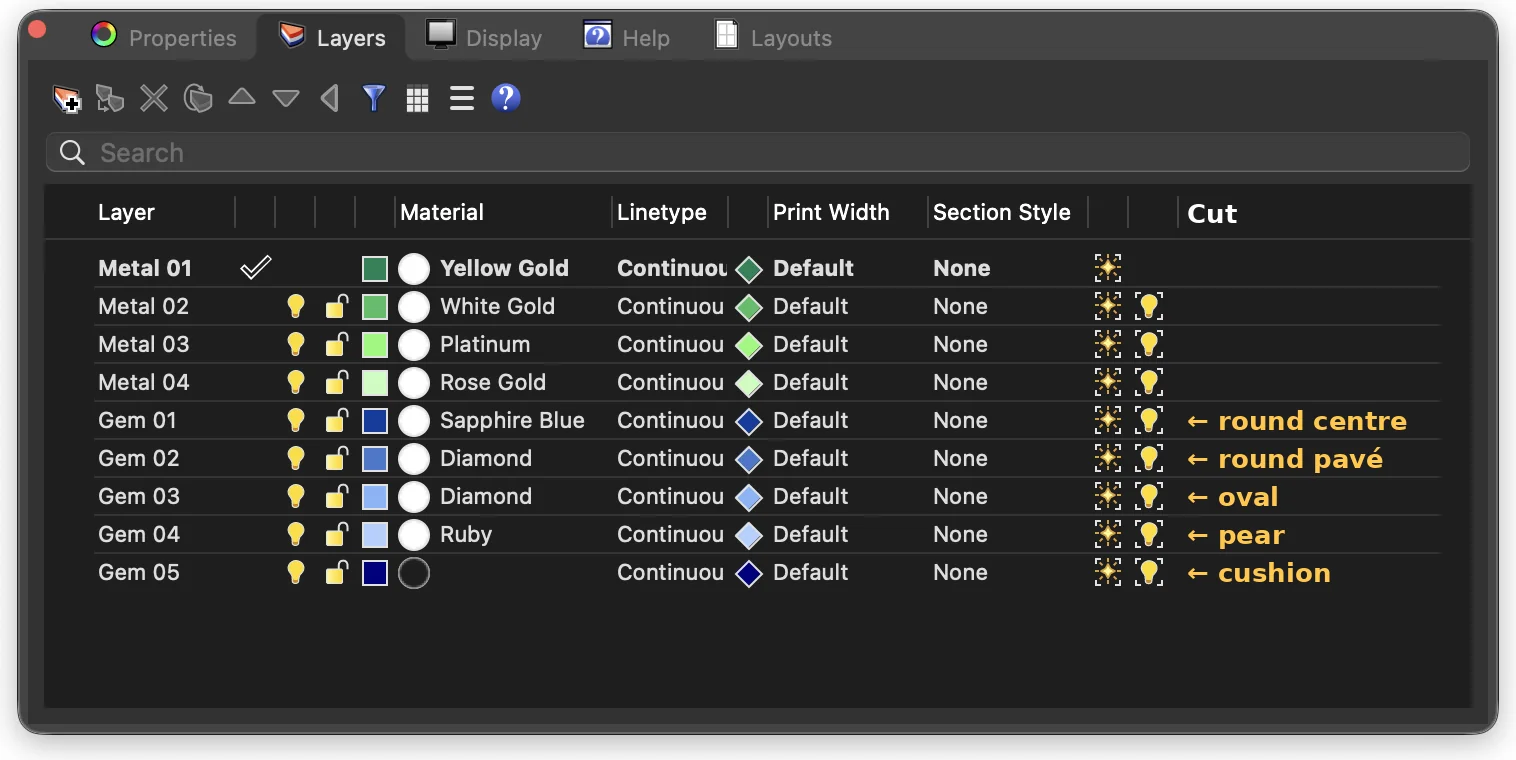
- Make one layer for each metal tone:
Metal 01, andMetal 02for a second tone. - Make one layer for each gem cut:
Gem 01for the centre cut,Gem 02for the next cut. - Make
Pearl 01orCeramic 01when the piece has these parts. - Select the objects of each part, then select the layer and use Change Object Layer.
- Put the prongs on a metal layer. Put only stones on the gem layers.
- Delete the empty layers.
All 7 steps are done.
Sub-layers
A sub-layer gets its own material, with the name of the sub-layer. Metal::Metal 01 becomes Metal 01. Keep the names of the sub-layers unique.
Make the stones render-ready
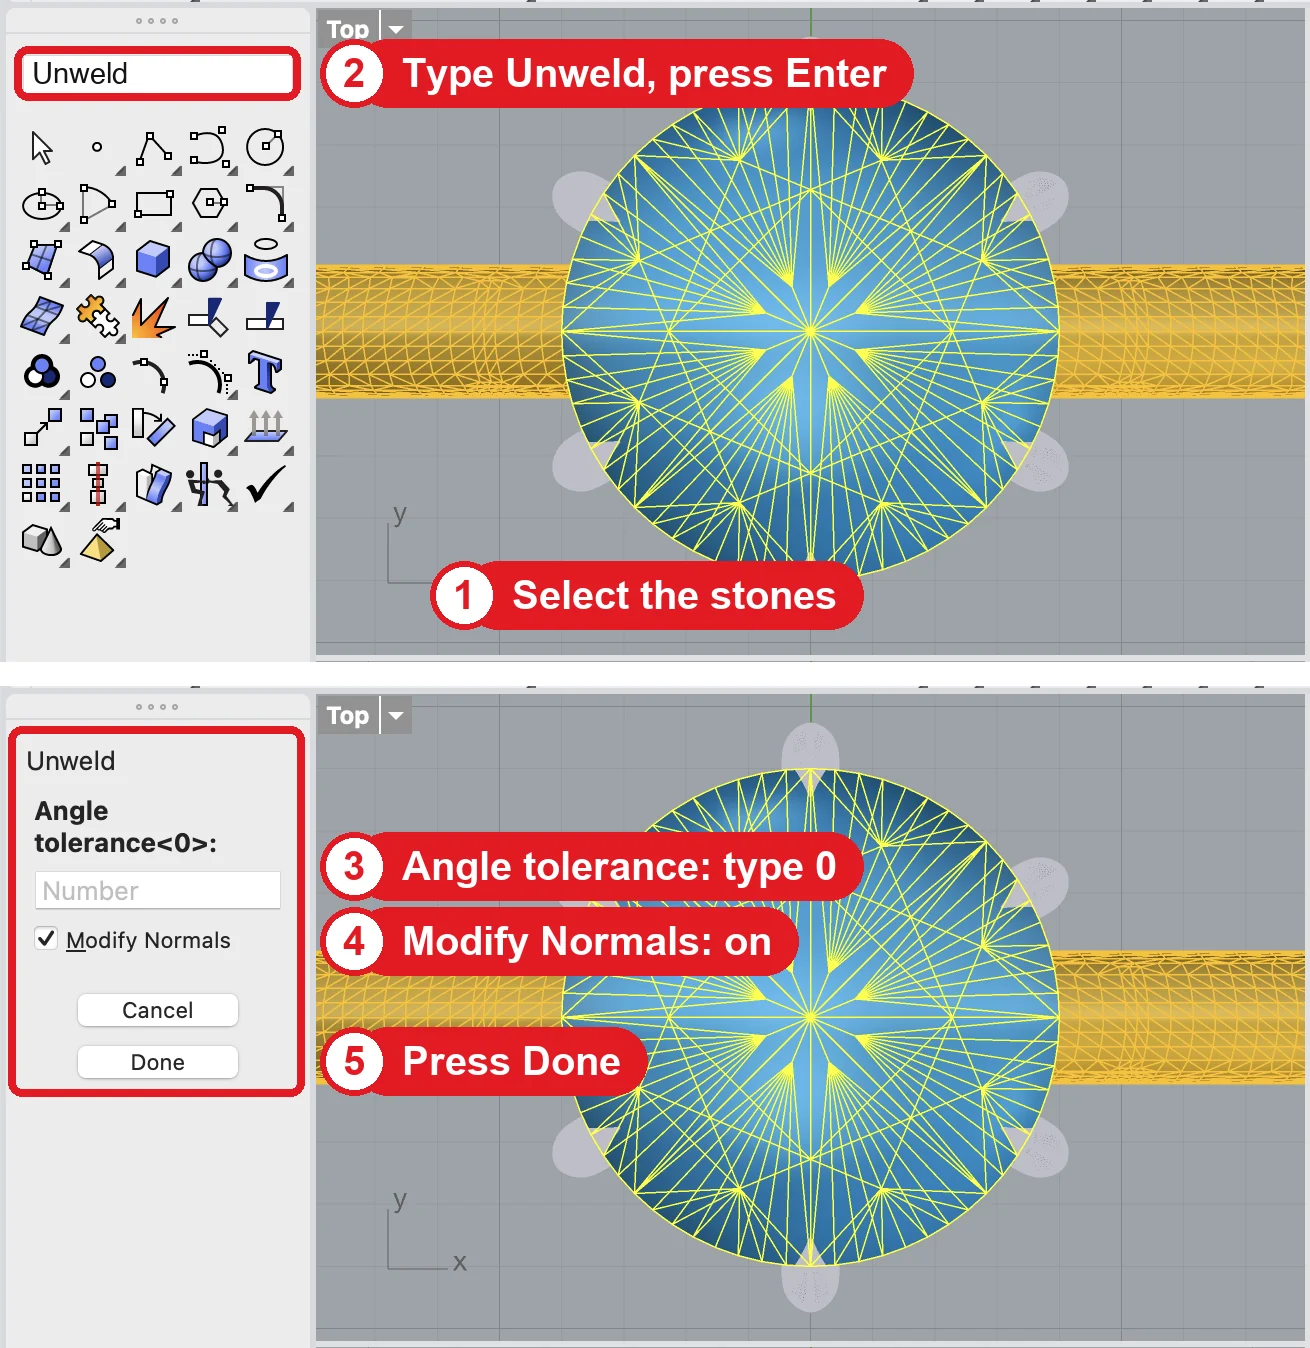
- Select all the gem meshes with
SelLayer, one gem layer at a time. - Run
Unweld. Set the angle to0. Set ModifyNormals to Yes. The facets are now flat. - Make sure that each stone is one closed, convex mesh with real facets.
SelBadObjectsfinds open or broken meshes. - Count the faces of one stone with
PolygonCount. A stone has less than 1,500 faces. - If the stones are NURBS, convert them with
Meshfirst. Use a low polygon count: the facets are flat planes.
All 5 steps are done.
Do not mirror a stone
Mirror turns the faces of a mesh inside out. Copy the stone with Copy or Rotate instead.
FlatShade is not enough
FlatShade changes only the display in Rhino. It does not change the file. Use Unweld.
Make block instances of the identical stones
A block instance places one geometry many times. The file stays small, and the renderer bakes one refraction map for all the instances.
- Keep one stone of each cut, at the size of the smallest stone.
- Select the stone, then run
Block. Give the block the name of the cut, for exampleround. - Place the copies with
Insert, or copy the block instance withCopy. - Scale an instance to the carat size with
Scale. Rotate it withRotate. The instance keeps its link to the geometry. - For stones that are already in place, select them and run
BlockEdit, or replace them with instances of the master stone.
All 5 steps are done.
If your tool placed the stones as block instances, keep them as instances. Do not run Explode on them.
Join the metal
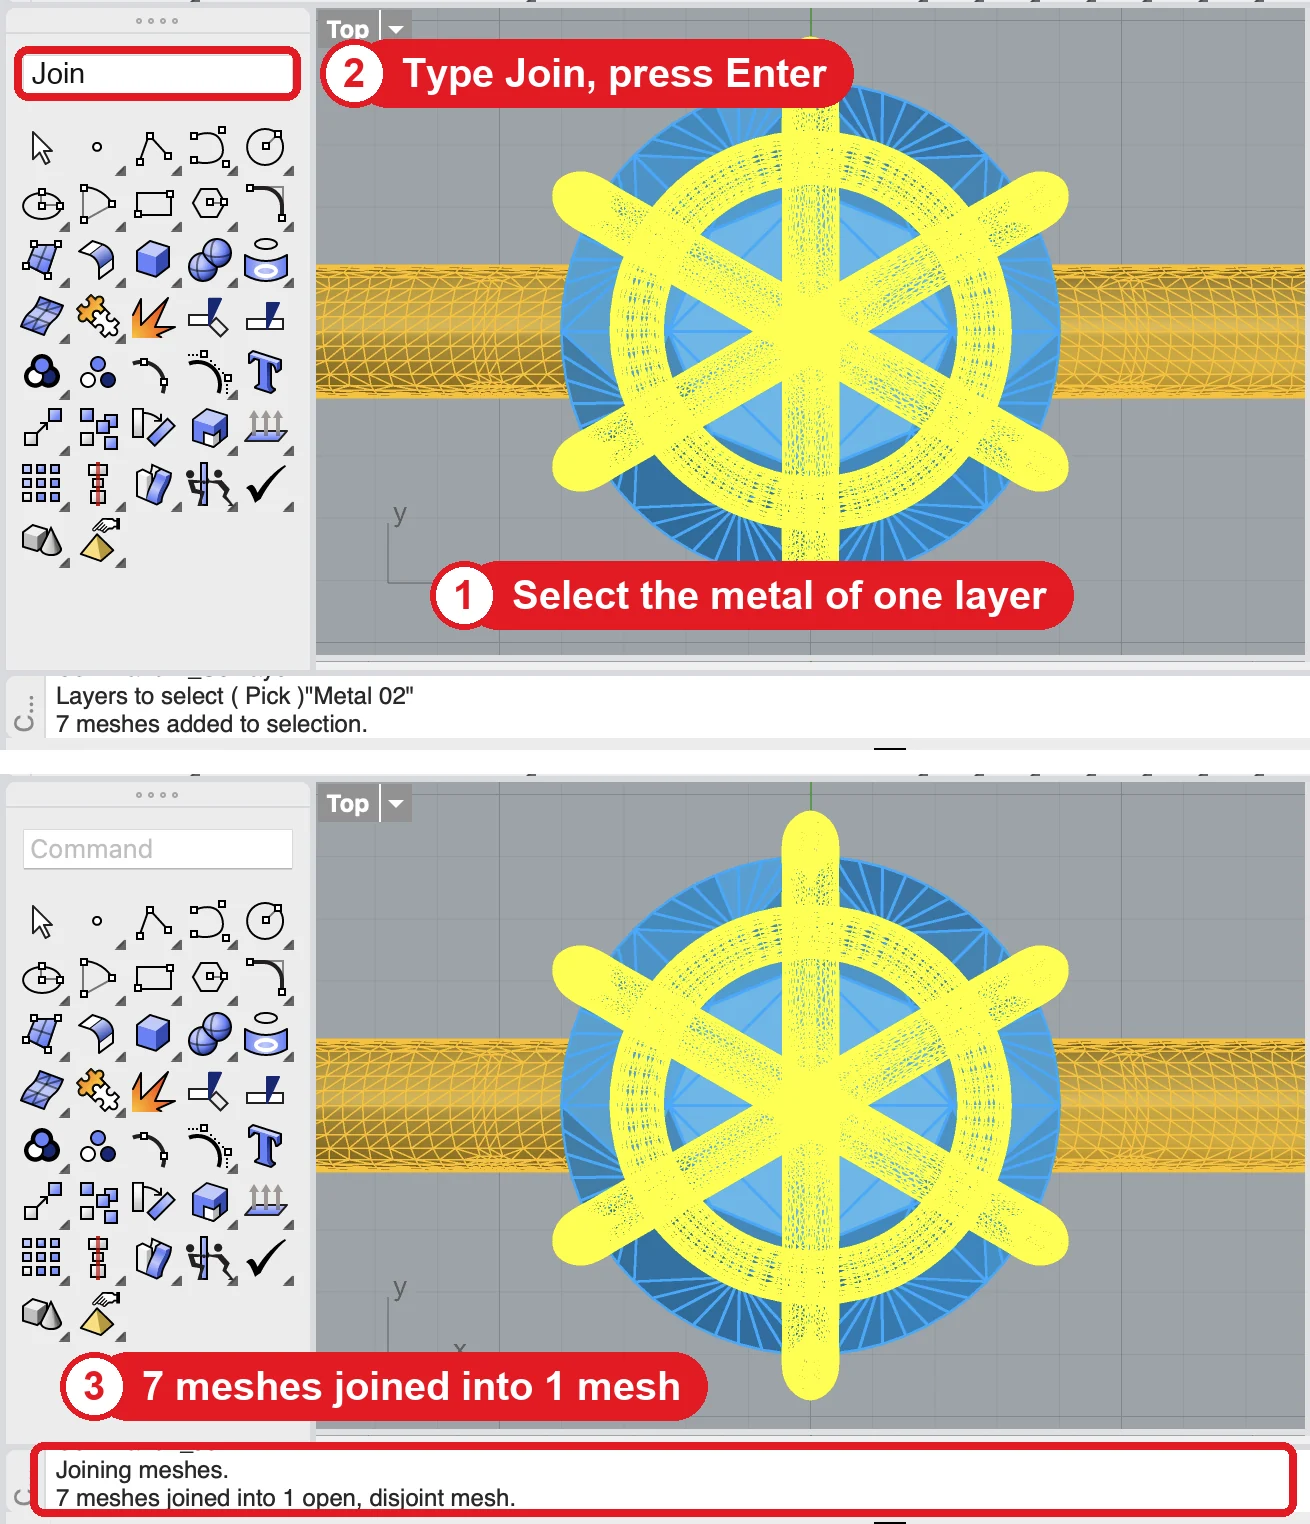
- Select the metal meshes of one layer with
SelLayer. - Run
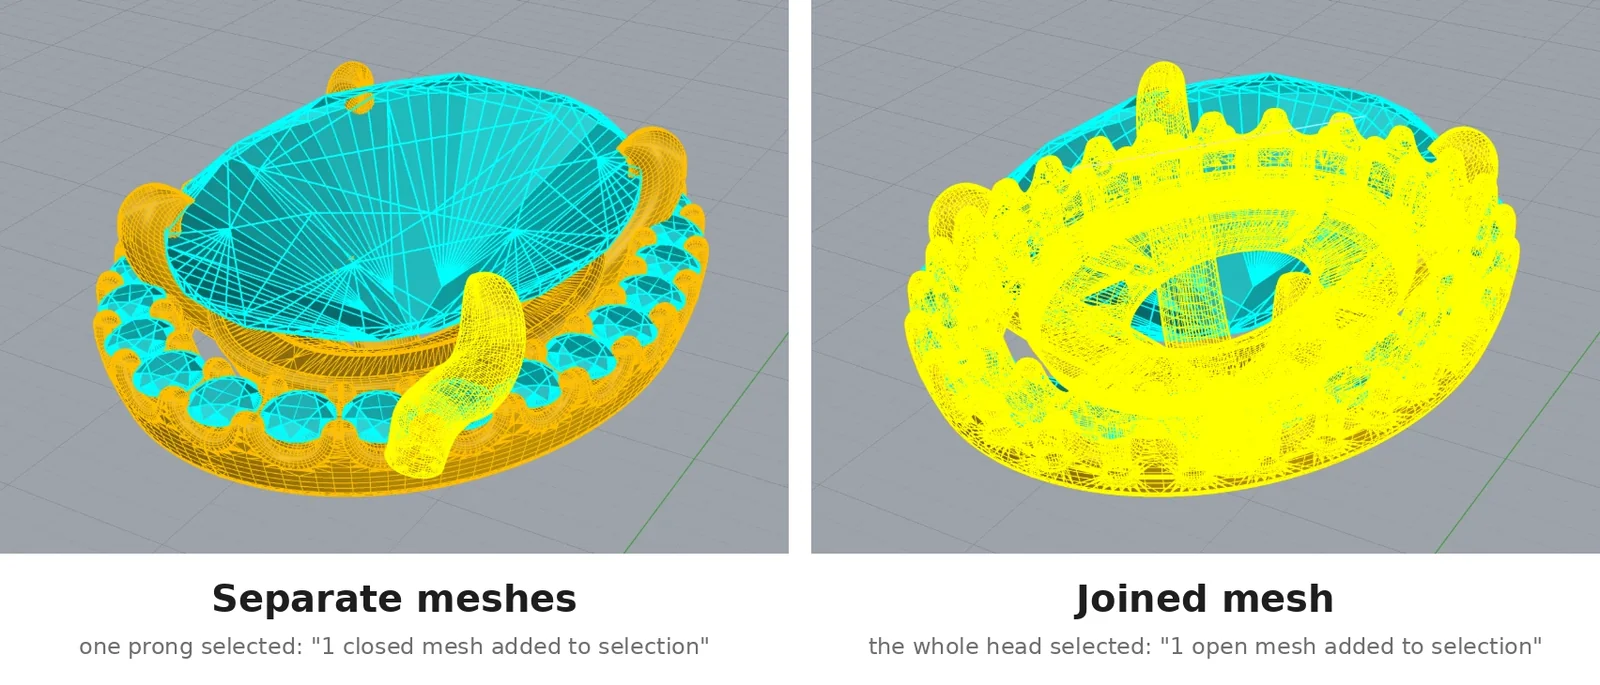
Join. The parts become one mesh. - Repeat for each metal layer.
- Make sure that the metal normals are smooth. If the metal shows flat facets, run
Weldwith an angle of30.
All 4 steps are done.
Keep a part separate only when it needs a different material, or when a configurator shows and hides it.
Reduce a heavy model
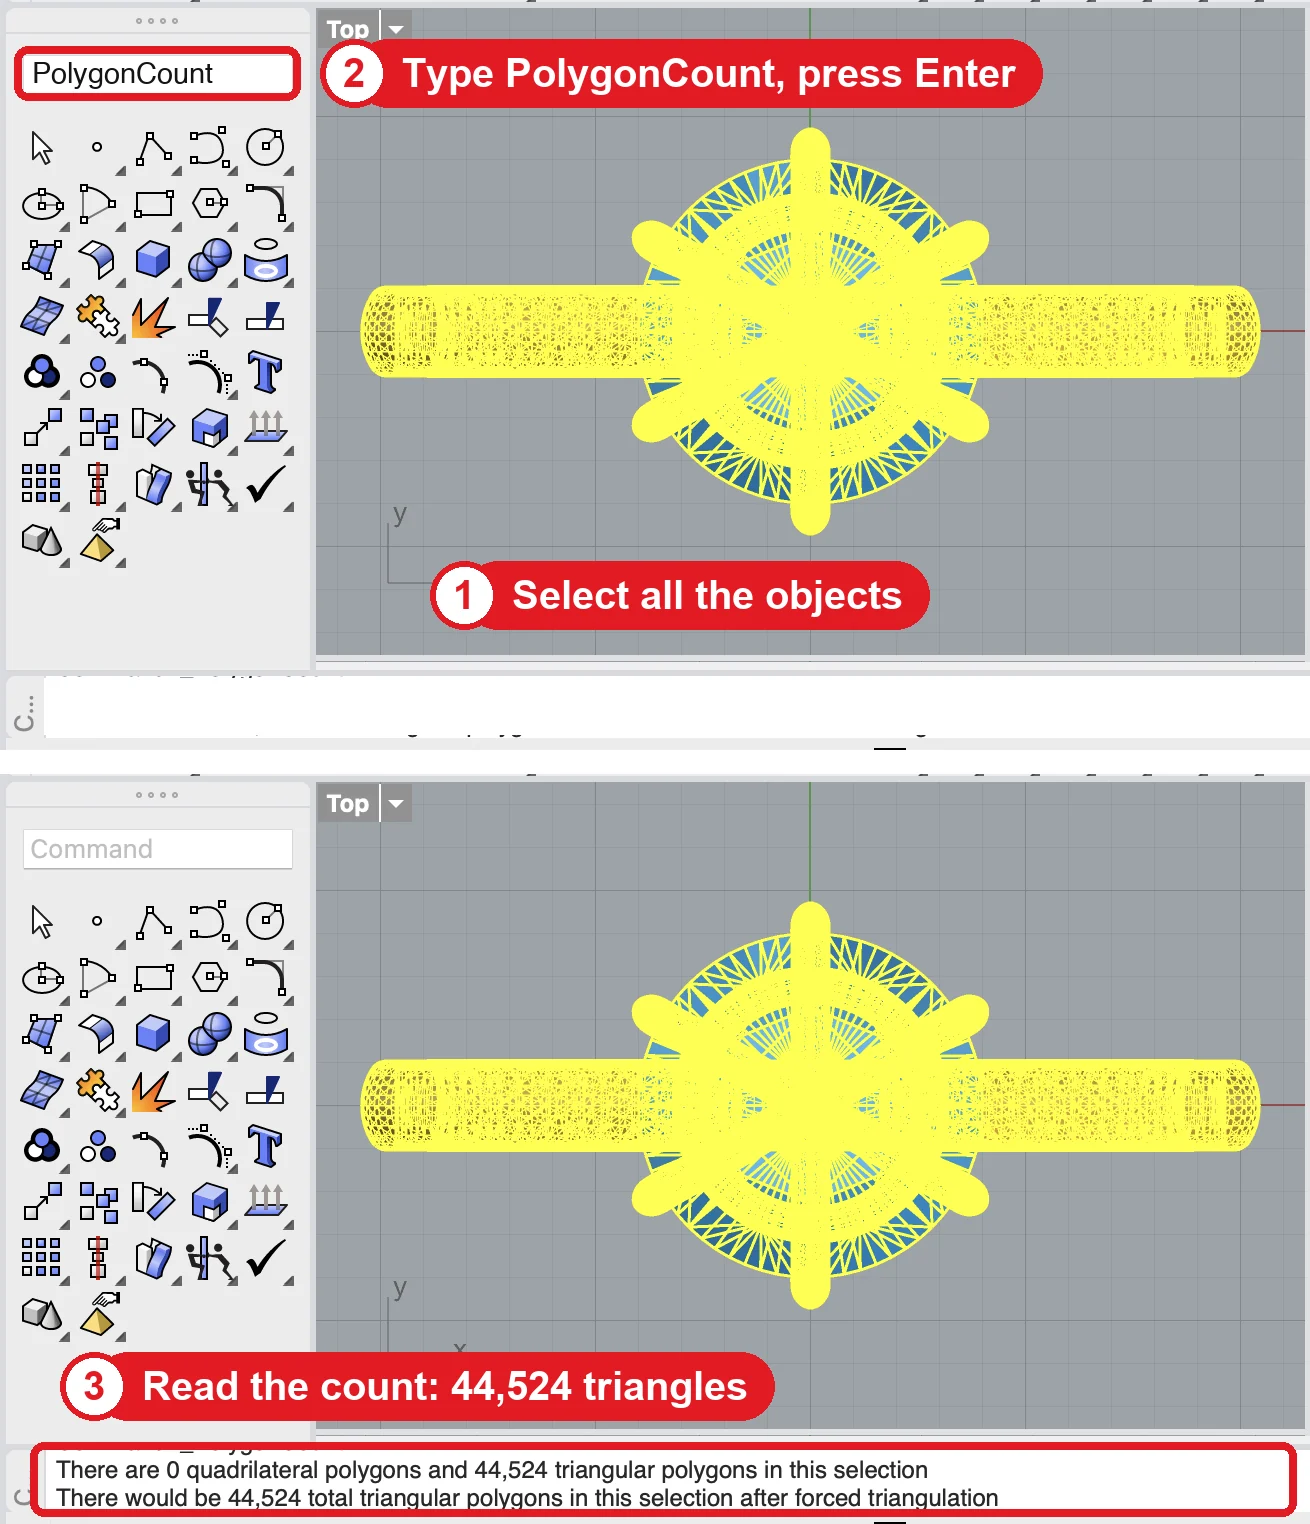
- Run
PolygonCounton the whole model. The model has less than 200,000 triangles. - If the model is heavier, select the heavy metal parts and run
ReduceMesh. Set the polygon count. Look at the result before you continue. - For NURBS surfaces, set the render mesh quality before you switch to Shaded mode: Options, Mesh, Custom. A fine mesh on a small ring makes a heavy file.
- Delete the objects that are not part of the piece: curves (
SelCrv), points (SelPt), lights and dimensions. - Run
Purgeto remove the unused blocks, materials and layers.
All 5 steps are done.
Clean the file
- Run
SelDupand delete the duplicates. Two surfaces at one position flicker in the viewer. - Run
SelBadObjectsand repair what it finds. - Turn on every layer that must show. A hidden layer stays hidden after the upload.
- Shorten the prongs, round the sharp edges and close the seams of a production file. A render-ready file looks like the finished piece.
All 4 steps are done.
Export the file
- Convert SubD objects to meshes with
Mesh. The platform does not read SubD objects. - If the file uses linked blocks, change them to embedded blocks in the Block Manager.
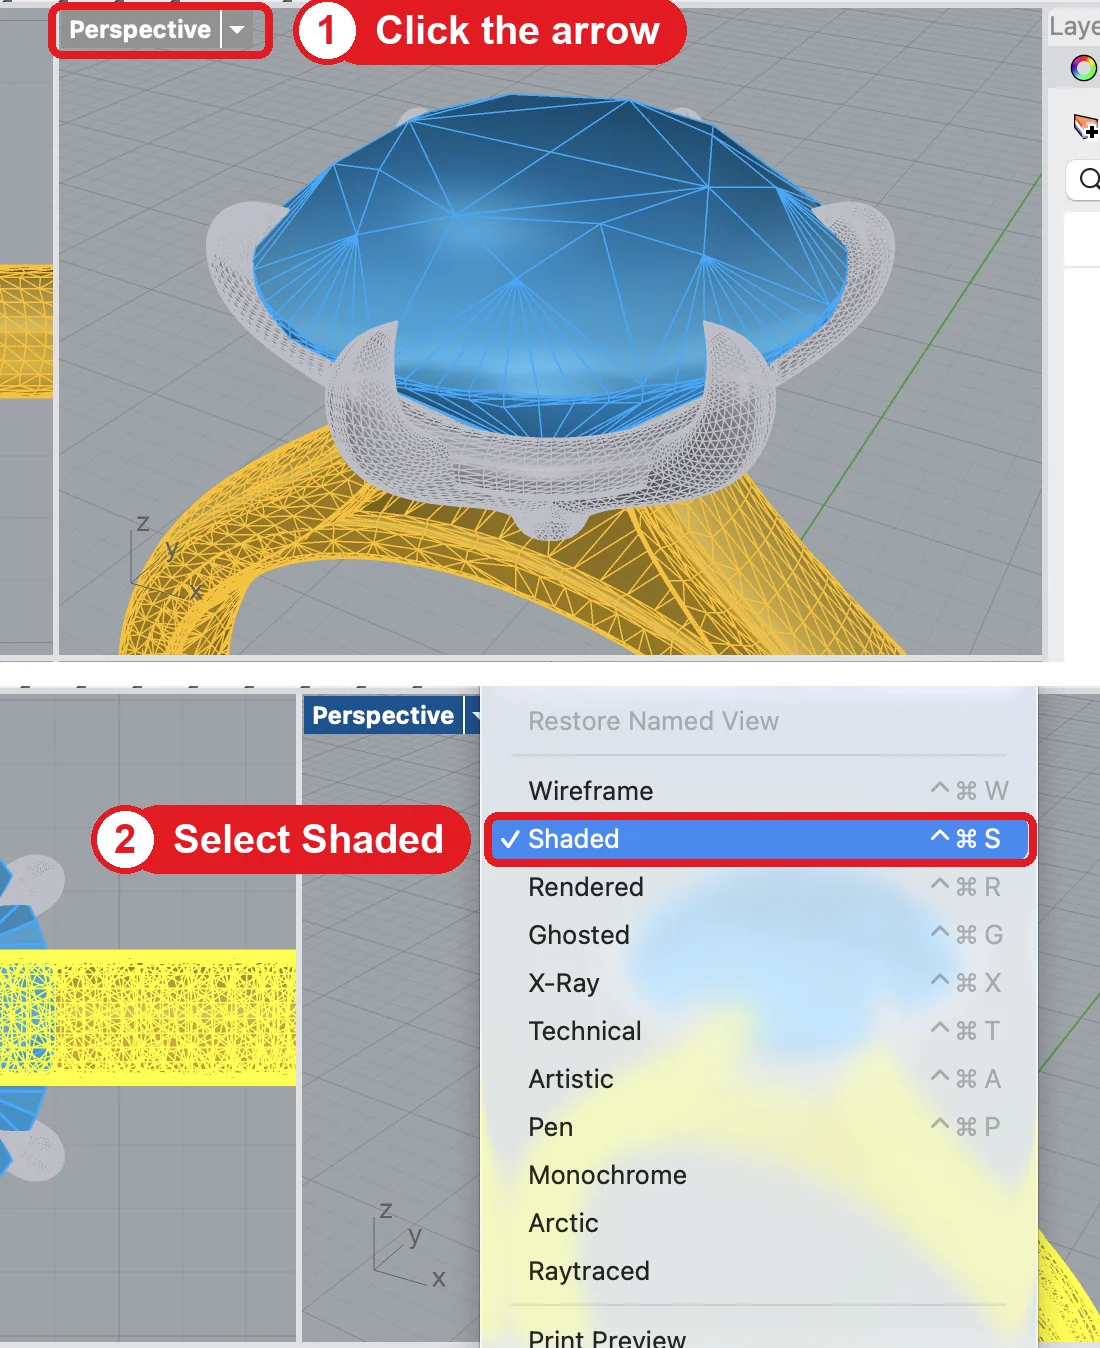
- Set the viewport to Shaded mode. Rhino now makes the render meshes of the NURBS surfaces. Rotate the model one time, so that all the meshes are made.
- Select File, then Save As, or Export Selected.
- Select the file type Rhino 7 3D Models (*.3dm) or Rhino 8 3D Models (*.3dm).
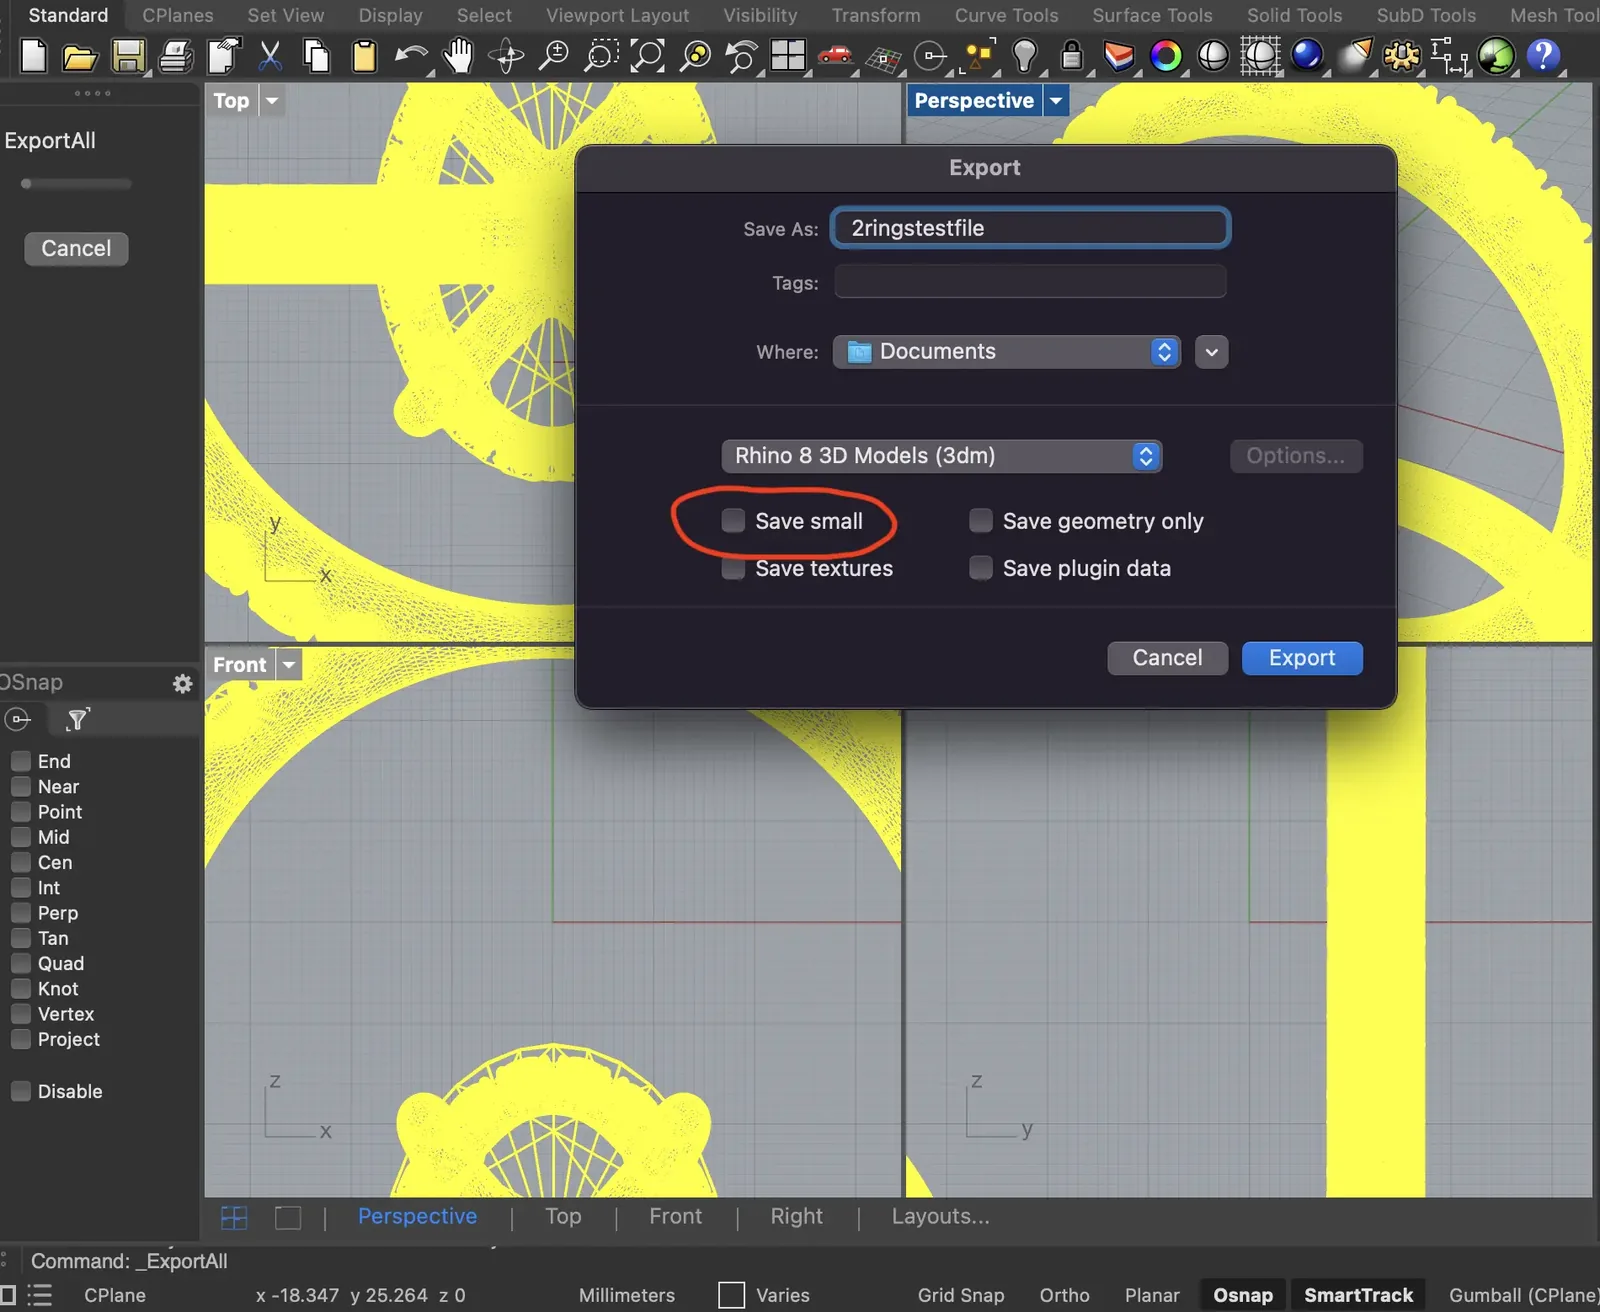
- Make sure that Save small is off. Save small deletes the render meshes.
- Make sure that Save textures is off, unless the piece uses textures.
- Select Save.
All 8 steps are done.
The two silent errors
A file saved in Wireframe mode, and a file saved with Save small on, both look correct on the disk. On the platform they show nothing, or they show only the curves.
Send the file from Rhino
With the Rhino plugin, you send the model from Rhino to a live link, with the same layer names. The plugin exports geometry only. You apply the materials in Playground.
Videos
Prepare the layers and the gem cuts in Rhino. Rename the layers to Metal 01, Gem 01 and Gem 02, move each cut to its own gem layer, put the prongs on the metal layer, and delete the empty layers.
Export from Rhino. Switch the viewport to Shaded mode, then export with Save small off.
Import and layer a 3DM file in Rhino.
Repair wrong normals in Rhino.